Disabling underlays with Dynamo
Today a short post about setting multiple (or all) view underlays to none. It can save us loads of time as usually we have to do it each time we export or print drawings. Unfortunately setting underlays to ‘none’ has to be done manually for each plan view.
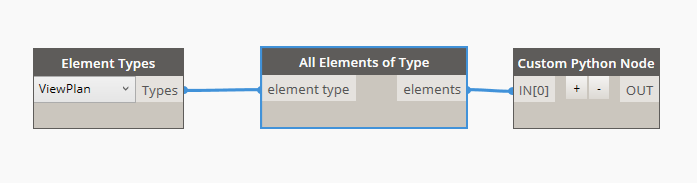
One thing that can help us with that is a Dynamo addon, which is great for simple and repetitive tasks. By using it we can take all the plan views from the model and perform desired operation on them. Unfortunately out-of-the-box Dynamo does not contain a node which can disable underlays. However it is not a very complicated function and we can create it with just a very simple code inside a Python node. The most important part of it would be:
view.SetUnderlayRange(ElementId.InvalidElementId,ElementId.InvalidElementId)
Where view is our floor plan to be modified. When we desire to set it’s underlay to ‘none’, we simply set both it’s ranges to a non-existent element by providing InvalidElementId value.
In case of some older Revit/Dynamo versions the code could look like so:
view.get_Parameter(BuiltInParameter.VIEW_UNDERLAY_ID).Set(ElementId.InvalidElementId)
Because we are making changes to the model, we have to wrap our function inside a so called Transaction. Before making those changes we have to open a transaction and close it afterwards.
doc = DocumentManager.Instance.CurrentDBDocument
TransactionManager.Instance.EnsureInTransaction(doc)
#our modification goes here
TransactionManager.Instance.TransactionTaskDone()
The complete code that we need to put inside a Python node could look like this: